Pages

Monday, 30 April 2012

Show and Tell

As you had two tutorials last week, I thought you might like a bit of a rest this week, so instead I am going to share a couple of completed projects from this week together with some bits and pieces that I acquired over the past couple of weeks.


This weekend, I made a smaller tea cosy using a number of different techniques - machine embroidery, free hand embroidery, ribbon flowers, applique and chinese ball buttons.  Having battled with the cord for the chinese ball buttons... there was a degree of language involved and a deep regret that I failed to get past the reef knot and the clove hitch in the brownies... however I did crack it.  Just love the technique you use to cover the cord!  There will be a tutorial...
Argh... cropping tool will not work...
Do you remember when we did some basic embroidery back in January and I told you about the book that I learnt from... well I managed to track one down on E-Bay... it is just as I remembered and my fingers are itching to get hold of some embroidery cottons.   It has lovely simple line drawings and you feel that the Bayeux Tapestry is well within your reach!  Actually the book and its reminds me of the Catholic catechism, I was one of the lucky ones who just missed out on having to use it but my brothers and sister had to endure learning it.  Although my sister did admit that she used to pray that she would not get called to be a nun... that is until one of the nuns at the Convent mentioned that was what she used to do... Annette abandoned that course of action pretty quickly!


So, you remember the little dress which I made last weekend, it now has a matching pair of ruffled panties to match it.  I used a french seam inside the panties and the elastic around the legs goes through a bias binding casement... more of bias binding later!


I have finally capitulated and bought myself a bias binding maker... no not the electrical one that you see on Create and Craft but the old fashioned variety that looks like a whistle and is used in conjunction with your iron... I feel a bias binding tutorial coming on... you have been warned!
Hmmm... I know it looks like nothing but it does make great bias binding!
And finally I found two great ribbon tapes, cheap enough to use to wrap up a handmade gift and robust enough to cut up and sew onto hand crafted knits and sewing projects.
Well a little later than usual, I think it's about time to head over to Wendy's Handmade Monday, brilliant inspiration from the best of the nation's crafts people!

Sunday, 22 April 2012

Sewing 101 - Part 2 - Making Up

Welcome back after drinking your coffee and your break.  Now let the real fun begin, we are going to start sewing in earnest, but of course, you know that we are not going straight to the machine, switch on your iron, get the instructions to hand and collect a couple of scraps of the fabric which you have cut out.
Switch on your sewing machine, make sure you are working in good light and try some simple running stitches on your fabric to make sure that the tension of your stitches is correct, adjust it as necessary.  You will often see that a pattern asks you to stay stitch the neck edges, this is just a line of running stitches on a single piece of fabric which stabilises the fabric and ensures that you do not stretch or distort it when you are working with it.
The dress I am making has four pleats on the front, we have marked their place with tailor's tacking, pin together the marking - I place a pin through one piece of tacking and then check the other side to ensure it lines up.  Now depending on how confident a sewer you are, you can tack the pleats together or pin them.  When you do pleats, start from the centre and work towards the outside, working equally in each direction, so one right side, then one left side and so on.
Next it's over to ironing board, press the pleats to the centre, always to the centre... same goes with darts and whether it is the front or the back of your piece, they always go to the middle.  Sew them down  about 1/4" from the raw edge.

Now I am to sew up the back to the point where I will insert the zip, you will see a little notch, make sure you match up the notches on both sides, this will ensure that your work is even and accurate.  Press the seam open, you will notice that I tell you to press all your seams open, this ensures that your work is even and you do not end up chunky lumps that tell everyone that your garment is homemade rather than a one off couture piece.
Next come the shoulders, zap across with your running stitch, and repeat this down the sides, remembering to match up those notches accurately.  Cripes it looks like a proper little dress now, you are on your way to working at an atelier in Paris... but there is more to come.
I don't have an overlocker, but I like my seams to look neat and tidy, so I am going to fold the sewn seam allowance in and sew down them too.
Right, now for the bit that you have been dreading... the Zip!  I am going to let you into a secret, they are really easy and if you make a mistake you can always undo it and nobody dies, really you can do no damage inserting a zip.
Remember how you pressed the back seam open, pin the left hand side, flush with the teeth of the zip, keeping the edges of the fabric together, pin up the right side so that it covers the zip teeth.  Tack the zip in place, and then fit your machine with the zipper foot and slowly sew it into place... now wasn't that easy?
We are almost there, let's get going with the bias binding which is going to ensure we get a great finish on the neck.  Open out one side of the tape and start pinning, with right sides facing to the neckline along the folded line of the tape.. hmmm it's a bit tricky because it is curved so we are going to ease it - remember we did this with the glasses case - we need to cut small triangles into the neckline which means that it will sit more easily and the fabric will curve with the bias binding. Sew the bias binding onto the neckline.

Out with your iron again to get a sharp edge around the neck, and pin the other side of the bias binding to the reverse side of your fabric,  Now it is back to the hand stitching, to slip stitch this into place, remember to pick up only one or two threads so that your stitches do not show.  Carefully press the binding into place. Next repeat the bias binding process around the sleeves just as we have done with the neck.

Finally we have the hem, there are a variety of ways of doing this, from simply rolling over 1/4" and pressing, followed by 1/2" and just top stitching it (yes, I know it's running stitch, you know it's running stitch but calling it top stitching makes it sound couture!)  Or we could slip stitch it into place... or we could have real fun by using a stitch on your sewing machine called blind hemming stitch which places a tiny vertical stitch which is seen externally and is almost invisible, hence the name.

One last press with the iron and find a small child to model it for you.
So, what next to cover on sewing 101, sleeves or buttonholes?

Right over to Handmade Monday to see what everyone has been up to this week.

And finally congratulations to Handbags by Helen, who is the winner of the log cabin cushion giveway... I will be in touch by mail to get her address and be off to the PO.

Saturday, 21 April 2012

Sewing 101 - How to Use a Pattern - The Preparation

I wrote at the beginning of the year that we would go back to basics over the year and it came home to me this week, that some people may not have been taught to do some of the techniques that I take for granted.  This is what happens when Mrs Logan got you through your Needlecraft & Dress O level at the Convent!  So I thought we might take a look at how to make clothes and use patterns together with the weird and wonderful language and terms used, so with this in mind I am going to make some baby clothes.
Right, let's get started, first find your pattern.  The packet that it comes in is full of helpful information to get you started, from the picture of the finished garment on the front, the sizes and level of difficulty, to information about the type, amount of fabric as well as the notions you will need to buy.  Notions is a wonderful, old fashioned word for the extras you will need to make up your items, eg the number of buttons, zips, embellishments, hooks, poppers, thread etc.
The pattern will also tell you how much fabric you will need in varying widths in imperial 36", 45" and 60" and in metric 90cm, 115 cm and 150 cm... do not think that you will save money by buying less fabric because someone has spent a lot of time ensuring that the pattern pieces will fit.  When you choose a fabric, make sure it is appropriate for the job... if you are making a pair of play trousers for a toddler then heavily embroidered brocade is not going to cut it... especially after a few turns in the washing machine!
Open the packet, inside you will find more reading, now I know that like me you will want to get started but don't!  Set aside the paper pattern pieces and read the instructions, not once but at least twice... yes, it is a pain but it will save you so much wasted time... I promise and I would never lie to you!


You will notice that your pattern pieces have multiple lines for each different size, make sure that you have true measurements of your victim/lucky owner to be, don't be silly and lie if this is for you... no-one cares what size you are, the whole point of making something for yourself is to make clothes that really fit you properly.
The next piece we are going to tackle is the pinning out.  Cut out around all the pattern pieces that you need to use, not to the actual line but just around the pattern pieces.  Let's get cracking with the iron, I know I bang on about this but you will find that the iron is one of your very best friends and now here come the really mad bit, you need to iron the tissue pieces as they will be very creased... so whatever you do turn off the steam element of your iron, otherwise you will end up with a mushy pile on your ironing board.  Next you may iron the fabric that you want to use.
Next look at the layout for your pattern, it is likely that your fabric will need to be folded in half with selvedge to selvedge (selvedge is the side edges of your fabric, sometimes it is a raw edge but often it is bound with little pin prick perforations).  Now to stop your fabric shifting when you pin the pattern pieces to it, pin your selvedges together.  I know you think this is a pain but it will repay you and make sure that your garments sit and hang properly and if you don't do it I will tell you all about a pair of Trevira trousers I had for Christmas 1973 which were even worse than wearing a pair of twisted tights and all because the cutter in the factory did not keep grain lines straight and it must have been bad if I still remember them nearly 40 years later!


Circle the layout that you need to use on your instructions, gather together your pressed pattern pieces and tick them off.  Now if you need to make any adjustments to the pattern pieces do it now... I am very short, which means I can take a good couple of inches off the hem and I have a short body (so that is Ros the Munchkin!).  On adult patterns you will see a line marked for adjustment on the body to make it larger or smaller, if you need to make it smaller by say 2", remember you will only need to pin it half the amount you need ie an inch above and an inch below the fold line.


Use the biggest table you can find to pin out, do not use the carpet, it will not give you a good result and I will come over to your house and walk over your fabric and make you iron it again, this is a promise.  Start pinning your pattern pieces to the fabric as shown on your diagram.  I usually start with the pieces to be pinned to the fold.  
Next look at the pattern piece, look for the arrow, this will need to lie on the warp or grainline (ie the threads that run up and down), with your trusty tape measure, place it in the corner of the arrow and measure to the selvedge or the fold and stick a pin in to hold it... now go to the other corner of the arrow and measure to the edge again, fiddle with it until it is the same distance as the other side of the arrow, only then can you continue to pin the rest of that piece to the fabric.  When pinning your pieces, pin on the diagonal on the straight lines and in the corners just like the example below, you  do this so that if your scissors try to cut through the pin, the pin will slide back and do no damage to your precious scissors.
Fold your fabric up as you go along so that it does not pull and distort your grain line.  Now comes the fun, cutting out.  Stand up when you do it, it gives you more control, put your non-cutting hand flat on the fabric to keep it still, and I have been known to put books on the table to keep it still whilst cutting, remember you can move round too, to ensure you cut precisely.  On your pattern pieces you will see triangles, you need to cut round these carefully as they will help you place the pieces precisely together when you come to sew them together.
Collect all your pieces together, chuck away the scrap tissue paper, and put your fabric scraps into the applique bag.  Now I want you to get your bobbins out, find one with thread which is a totally different colour to your fabric, in truth you should not over fill bobbins with a new thread but who wants to waste cotton, so we are going to use it to do our tailor's tacking and marking.
We will use tailor's tacking for the pleats at the front - so what is tailor's marking, it is a method of marking fabric temporarily to show where we need to sew.  I am assuming you know that tacking is just a line of running stitches, well we are doing sloppy stitches with a double thread which means we will not pull the stitches taut to the fabric but leave enough thread on top that you could slip your finger under it.  I have done this for the four lines shown on my pattern. Now cut each loop.
Tailors marking is used for darts and placement points for zips, you will see on your patterns small circles, in these, use your double thread, sew twice around your finger, cut through the middle of the loop.
Lift the pattern piece off the fabric, fold it and put it back into the packet.  Gently tease the pattern pieces apart and cut the threads to leave marks on both sides of the fabric.


When you have done this on all pattern pieces you are ready for the next session... but in the meantime go and have a coffee and we will do the sewing up in the next blog post!


Sunday, 15 April 2012

Let's Quilt While We're Ahead - The Log Cabin Cushion

We have been doing quite a few projects recently that have used some quilting now it's time for us to venture into some proper quilting blocks and I thought we could start with a nice easy pattern, Log Cabin which is also known as Cathedral Steps.  It is a great block to start with as it gets you used to cutting and sewing accurately.  I know that the purists may say but you are using a machine but sometimes you need some instant gratification and later we will move on to hand sewing quilting blocks... but lets learn to walk before we embark on a marathon.
So let's get started, you will need:
A selection of fat quarters (I have a pack of six quarters and I know that I can get 3 cushions from this)
1/2 metre of plain contrasting fabric
Wadding
Rotary Cutting Wheel
Self Healing Mat
Rotary Cutting Ruler
Thread
Pins
Cotton
Small scissors
Fish Knife
Cushion pad
Iron (dry not steam)
Ironing Board
Zip - I am using a 9" zip for a 12" cushion pad
Before you start, iron every piece of fabric flat... although it may look flat, it will need pressing.
If you are using fat quarters, cut along the 22" side as this will give you the longest strips of fabric.  You need to cut your strips 1 1/2" wide - in quilting we use 1/4" seam allowance - you may hear this called a scant 1/4" seam allowance because it needs to be really accurate and this is a fine seam allowance.  Very often you will find that the distance from the needle to the edge of the foot is a quarter of an inch, or else mark it up on the plate of your machine so you can use that as a guide.
Now a safety warning, Rotary Cutter are very dangerous, incredibly sharp, always cut away from yourself... and do not let me catch you leaving the safety catch off or woe betide you... say to yourself, "cut and close."


From your first strip, cut a square 1.5" x 1.5" which will make a square 1" square when you have sewn up the seams.  
From your next strip cut another square exactly the same size, and sew it to your first strip, Iron the seam closed to the outside - do not use steam as this can distort the fabric and stretch the seam.  
Now cut two pieces the same length as your two squares and sew them on each side and press the seams to the outside.
Next cut a length that fits across the top and sew it across the top - you have created your first round.  Remember when you cut, to measure twice so you cut once.  You will make mistakes and even after all this good advice that I dish out, I still lose concentration and make mistakes.
Now repeat this in the the same manner - ie, the short piece is always on the same side and the two medium pieces on the sides and the longest piece always in the same place... do be careful because it is easy to muddle them up (says the voice of bitter experience).
Continue until you have a square slightly bigger than the cushion pad you want to use. 
We are then going to add a final round but instead of 1.5" we are going to 2" strips to finish off the cushion.
Now cut a piece of wadding that is 2" larger all round and a piece of cotton that is an inch larger all round.  You are now going to make a sandwich with the plain fabric at the bottom, next the wadding and finally your pieced piece of quilting.  
Starting from the centre and using flat headed quilting pins, pin the sandwich together.


Next we are going to stitch in the ditch - this means sewing close to the seam,  Remember how we ironed all the seams to the outside, we are going to sew on the other side of the seam where there is the least amount of fabric (you are only going through three layers and not five!).  Again I have used my foot for guidance but this time, I used the inside of my foot as the guide, keeping it running along the seam.
Start in the middle square, when you come to the corner, leave your needle down in the fabric, lift the foot, turn your work by 90' and lower your foot sew down the next side and repeat until you have sewn all four sides.  Trim away the excess wadding and fabric


Measure your quilted square, and add 1.25" to one side (to allow for a 5/8" seam allowance), so if the cushion is 16" square, you need to cut a piece of fabric 16" x 17.25"... Now cut it in half, so that your pieces  measure 16" x 8.5/8".


Now insert your zip - You want it to sit in the middle, which is just a quick bit of subtraction and division - your zip is 9" long, take that away from 16 = 7, now divide it by 2 = 3.5".  This means you will need to mark  in 3.5" in from each side and sew a seam at each end up to this point.  And now you can press the seam OPEN!  
Pin your zip in, remembering to place one side snugly against the teeth of the zip to ensure that the zip is well hidden.  Open the zip fully - this will be important - believe me!
Pin the wrong sides together and sew a 1/4" seam all the way around.  Cut off the corner triangles, so that when we turn the cushion we will get sharp corners.  Remember how I told you to leave the zip open, well that is so we can turn the cushion right sides out, it is a swine to try and undo a zip from the wrong side.
Use your fish knife to create your sharp corner - fish knives are brilliant for this, they have no sharp blades so will not cut your stitches and the soft point of the tip will tease out the point - I am so glad I found another use for them.
Press the cushion and pin the final round together - we are now going to sew around the inside seam, to create an Oxford style cushion with a valance running around the cushion using a seam allowance of 3/8". Sew in your loose ends and sit back and enjoy your cushion.
If you want to you can totally change the effect by working two sides in one fabric, and the other side in another fabric, which really does create the Cathedral steps effect.


I have also thought that it might be nice to give this cushion away, so if you leave a comment on this post during this week, I will pull a name out of the virtual hat next Sunday morning and be in touch to send it to you.


Right, time to take a look at Wendy's Handmade Monday and see what everyone has been making over the last week.


What's that... did I buy... err yes, just a little sock skein.  And no, Pierina found a rather lovely Debbie Bliss pattern but she is threatening to make my pink cardie if she finishes her project first...
This is a fabulous hand dyed skein from Chile... soft as an angel's breath... and the last in the shop :)


Good luck with winning the cushion!


Thursday, 12 April 2012

I am going to be led astray, I just know it!

On Saturday my very best friend is going to lead me into temptation, she is going to take me to a great wool shop and I am going to be her yarn consultant... I am not going to buy, I am there merely to advise... (yeah, like that is going to happen)


As you will remember, I have known her since I was 11 and we had coat pegs next to each other, I am God mother to her boys... in fact I taught them to blow raspberries and I know my role is to lead them astray wherever and whenever possible... she really should have thought this through.  But on Saturday, she goes to buy wool and I will be there... not buying you understand, merely to temper her choices (only if someone steals your purse and chops off your hands will you not buy).


Her niece is expecting a little girl in May, I have been through my patterns... I know this one is perfect:
My friend Pat made it, Pat is knitting perfection, the only woman I know who knits a swatch for a swatch, and it was fabulous, soft to the touch and gorgeous to look at.


So why do I think this is the one, well Pierina is Italian as is her niece, her niece lives near Milan, fashion centre of the Universe... so this is the one.  It has an elegant simplicity, (matching booties, too) the bow details on the pocket lifts it above ordinary but the challenge is making a border which fits precisely and lies like a dream. This was made for Cashmerino, to be touched by relations and cooed over by friends, never to touch a child for fear you might have to wash it before the knitter sees it on the baby.  


Otherwise I may need to look at my mother's 1940s stash of patterns and we could be bringing the pixie hat to Italy for the first time:
And she is still my best friend... well at least till she sees this post.


P.S. She still thinks I am only going to advise, I have to be honest I reckon the least amount of damage will be socks, just to keep me busy on the train!

Monday, 9 April 2012

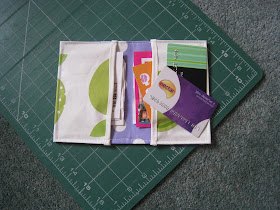
The Mother of Invention ... Oil Cloth Loyalty Card and Voucher Wallet

This week's tutorial is born out of necessity.  I don't know about you but to be honest, my purse is just not big enough, if it isn't receipts, then it is loyalty cards (I am into double figures with these... I am a coffee tart in London!) and school vouchers that I am expected to stuff in there.  As a Chair of Governors for an inner city primary school, I grab every school voucher I can get... for my American readers this is just like being on a school board although we are all volunteers and unpaid, and I have been a governor for over 20 years but that is another story and you know I will tell you eventually!


So I thought if I had a loyalty card wallet, I would be made up, also it will be somewhere that I can store any expense receipts and I don't know about you but why are purses always in dark colours so you cannot find them when you need them?


Let's get started, we are going to make this one from oil cloth (remember how we conquered it here recently) but you could use a heavy duty cotton fabric with a sturdy iron on Vilene interfacing.
You will need:


2 pieces of oil cloth or cotton fabric 15" wide x 6" deep
14" bias binding tape
Cotton and scissors
Clothes pegs
Pins
Cup of tea or coffee
Place the oil cloth with right (shiny) sides facing and peg them together.
Now check the tension on your sewing machine on a scrap of fabric... it took me six goes to get it right, remember you are going to be doing slow and steady sewing, this is not a race, it is a stroll.


Sew up both long sides leaving the ends open.


Now go and make a hot drink, tea or coffee and sit with the sewing in your lap, this will warm up the oil cloth  and the warmer the cloth is, the easier it will be to work with.
Now turn the tube inside out and it will look like a sleeve, gently roll the seam, remember you won't be able to iron it as it will melt the fabric.  Using your hands flatten the sleeve so that the seams sit at the top and the bottom.
Take your bias binding and leave about an inch above the open end and pin it, then fold the bias binding over the open seam, clip it into place with the clothes pegs.  Then sew the bias binding in place leaving the same amount of excess at the other end.  Repeat this at the other end.
Decide which side of your oil cloth is going to be on the outside, then fold over each side 3" in on each side, folding the excess bias binding under and hold it in place with your pegs.
Top stitch around the wallet, I use the edge of my foot to guide me, when you come to the corners, leave your needle in the fabric and turn it 90 degrees so that you get a nice neat professional finish.
Finally trim any excess bias binding away and then put in your vouchers and loyalty cards.


Now let's take a look at what the team have made for Handmade Monday.