Pages

Sunday, 24 June 2012

It All Started with Scarlet Ribbons - Double Ribbon Handbag Charm

When I was a little, the class above us sang Scarlet Ribbons and were the stars at a local music festival... they also got to spend the early evening at the Kursaal in Southend, which was to a 10 year old one of the most exciting places in the whole wide world... they had a wall of death in there and I admit to being a tad disappointed when I saw it for the first time there there was no pile of bodies at the bottom!  At that time I wore my hair in plaits... this was after the incident when I had to have my hair cut when a hair roller could not be removed as my mother was going through her "daughter in ringlets" phase... I had mostly blue ribbons to go with my school uniform and I longed for scarlet velvet ribbons...  So I think that this might be when my love of ribbons bedded in and now even though my hair is too short for plaits, I have a rather decent collection of ribbons... just in case.
So this week as my garden has taken a bit of a beating with the rain and the wind I thought we could make a double ribbon flower bag charm with the aid of a little bit of hand sewing, which will bloom despite the weather... so let's get started, you will need:
2 yards of ribbon... up to you whether it contrasts or complements
Needle and thread to match your upper petal side
Ruler or tape measure
Matches
Felt circle
Air soluble pen
Decorative button
Handbag Clip
(You don't need an iron this week, although my mum did iron my ribbons and my socks too, but that is another story!)


Cut straight across the ribbon... OK, it has started to happen, the ribbon wants to unravel... light a match and  gently run it over the raw end of the ribbon and it will seal it... try not to set the ribbon alight, unless like my friends Marion and Elaine you want to check out the local firemen.
Pin the ribbons together so that the right sides are on the outside, at the top mark it an inch in continue to mark along at each inch, and at the bottom half an inch in, then continue to mark along at each inch.Thread up you needle and make a large chunky knot at the end, we are going to be gathering for England, so we do not want the knot to come undone... think Gordian with attitude!
 
Now we are going to do a running stitch from the corner to the mark half an inch in on the bottom and then up to the inch mark on the top.  Keep you stitches small and even, I have worked with four or five on each diagonal.
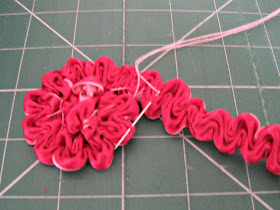
I find it easiest to gather as I go, working about half a dozen diagonals and then gently gathering them, you should finish up with a gathered strip of about 18". Firmly stitch with two or three stitches so that the gathers will not unravel.
Turn the ribbon over so that the front is face down and start working a spiral, catching petals with a slip stitch, this is going to look ugly, but do not worry because we are going to hide it.  Continue working around until it looks like an ammonite, and sew the end under.
Take a 6" length of ribbon and fold it over, stitch it to the back of your flower. In the centre of the flower, I have placed a little button to just lift the design a little.
Cut out a circle of felt which is slightly smaller than the circumference of the flower, pin it in place and slip stitch it onto the flower.
 
Thread it onto the handbag clip and pop it onto your bag... finally a flower which will not wilt!
If you don't have a local fabric shop with a decent haberdashery to source ribbons... I have Belle Fabrics in Leigh-on-sea and Bodkins in Thundersley or there are some fab ribbon sellers on line like Jane Means


And now, as is traditional on the blog, it is time to head over to Handmade Monday to see what everyone has been up to during this week.


Finally, if you wondered what it was that the 4th year of Our Lady of Lourdes Primary school sang with such aplomb in 1968, here is a charming version by Harry Belafonte.


Sunday, 17 June 2012

Going, Going, Gone... The Luggage Label Tutorial

The first time I went to New York was a disaster, especially as I arrived there in a pair of BA pajamas (the stewardess decided I would look better wearing my red wine...), the car that was picking me up was booked for the wrong time (note to self, not everyone can cope with a 24 hour clock) but it would have been much worse if I had not checked the bag I picked up off the carousel which had to be mine... except where did those rather scuzzy Y fronts come from?  That is the moment that I realised you need something to mark out your luggage from the herd... and I am not talking about sticky multi-coloured tape on your case but something a little more sophisticated, your very own luggage label to chime in with where you are going.
So let's get our kit together, you will need:
A fat quarter
A piece of mega, heavy duty inter-facing (it should be stiffer than a cornflake packet)
Pins, needle, thread and scissors
Pen and paper
Iron and ironing board, an if you have one an applique iron is really helpful


Draw a square 8" long by 4.5" wide, mark it at 6" on both sides and 1.25" from the edge on both sides on the top, draw a line from these marks.  Cut four from the fabric.
Now repeat this but an inch smaller, so a 7" long x 3.5" wide square, mark at 5" on both sides and 1.25 from the edge on both sides on the top, draw a line from these marks.  Cut two from the interfacing.
Pin two pieces of fabric, with right sides facing.  Now place one piece of interfacing on top of the fabric, 1/2" away from every raw edge.  Sew it into place as close to the edge of the interfacing as you can but leaving an  opening at the base of the label of 2".  Trim away the excess as close to the seam and you dare, then turn the label inside out and press it into place, tuck the opening in.  This is where your irons will start to come into themselves, take your time and manipulate it into place.
Now cut out a square in the middle of the other piece of interfacing - half an from each of the three straight sides and join up to complete the square. 
 Pin the fabric right sides together and pin the interfacing on top, sew around the inside of the square as close to the edge as possible.  Cut out the inside square of fabric, you will find it easiest to do this by cutting from corner to corner.  Roll the seam between between your fingers as it will be bulky and need persuasion from you and the iron to lie flat. Now sew around it close to the edge yet again, take it slow and steady to get a straight neat result.
Now fold the top fabric of the frame over the interfacing and iron, then repeat this with the reverse side, do this slowly with the aid of your iron, you may need to manipulate it very firmly.  On the two slanted sides, put in a pin 1.5 down from the top on each side and sew into place.
Now place your frame on top of the covered back and sew it together from the pins, which will leave the top open.  Slip stitch across the top.
Cut out a piece of fabric, 22" long by 2.5" wide.  Fold it in half lengthwise, sew across the top and down the length of the seam using a quarter of an inch seam allowance.  Trim the seam and use a knitting needle to turn the strip inside out.  Press the tie flat, tuck in the raw edge and slip stitch it into place.  Thread the tie through the opening in the luggage tag.


Now what I would dearly love to do is embroider my name and address and insert it into the tag... but until I save my pennies or get sponsored by a major sewing machine maker (all offers seriously considered!), we will make do with a piece of paper to make sure I don't lose my luggage.
And now it time to pop over and take a look at Handmade Monday where Wendy has some exciting news to share!

Sunday, 10 June 2012

To Wit, To the Loo - Carrie's Owl Door Stop Tutorial

People often ask how I come up with ideas for my weekly tutorial, sometimes it is something I spot in a shop which sets me off, other times it can be an article or even a comment from a friend... but this week I surpassed myself... the idea came to me when I was sitting on the loo!  I have to admit, I like patterned loo paper, don't ask me why, I just do.  Anyway, I ripped a couple of sheets off the roll and found myself staring at an owl, yes, you heard me, the loo paper has owls all over it... so that is where the idea came from...
So let's get started, you will need:
A piece of fabric 6.5" wide by 18" long
A contrasting scrap of fabric and the same amount of iron on interfacing
12" of ric rac braiding
Scissors and/or rotary cutter, cutting mat and rule
Pins, cotton, embroidery cotton and a needle
Paper, wine glass or large cup
Scraps of felt
A bag of rice
A fish knife
A penny
Air erasable pen
Iron and ironing board
Cut out your main piece of fabric, fold over 3.5" at one end, then fold the other end over so it measures 6.5" (it will overlap by an inch) leaving the piece at the back measuring 8".  Press it into place.
Now, take your glass and draw around it, then measure the diameter of the circle and make a dot the same distance from the edge of the circle.  Now draw a line to each side of the circle, it will look like a big tear, but when we cut it in half down the centre and you have created a pair of wings for your owl.


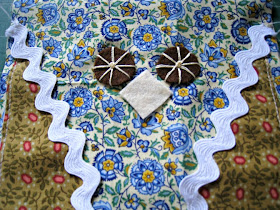
Pin the pattern pieces onto your contrasting fabric and cut them out.  Now, lay them on top of you interfacing an iron it on.  Cut away the excess interfacing and pin the wings in place on the long side of the fabric, I placed mine two inches above the short fold (which is on the other side) and sew it into place staying as close to the edge as you can.  Next take your ric rac braiding and place it over the raw stitched edge of the wing... do not worry about the braid only being able to go in straight lines, it will happily ease around the curves.  Pin it in place and now sew it down.
Decide what colour you want your owl's eyes to be, I chose a chocolate brown, pop two pennies onto the felt and draw around them.  Put the felt circles where you feel they look right for your eyes.  I sewed them in place using an embroidery thread, come up through the middle and go to 12 o'clock sew into the back, then back up through the middle and sew down to six o'clock, repeat then for three and nine o'clock.  Now do the same between each of these stitches (eight in total)... hmmm, the middle looks a bit uninspiring, so finish it with a little french knot.  Now, repeat this for the other eye.
For the beak cut out a square about an inch wide, fold it diagonally, place it beneath the eyes and sew it from corner to corner... now your owl is almost there.
Pin the ends together, leave a 3" gap in the middle and sew a half inch seam on each side.
Now pin the sides together and sew a 5/8" seam.  Check where your eyes are, because this is the top of the doorstop.  Mark in 1/2" down the side seam and across the top fold and another dot an inch from the side seam on both sides, draw up from the side to the dot on the fold, the down to the next dot, draw a line across to the dot on the other side and create the other triangles ... you have just marked out the ears, sew along the line and trim it close to the seam.
At the bottom of the owl, we are going to create a base like we did with Deborah's tote bag, iron open the seam and use the seam to bisect the triangle you have created, sew it an inch from the point and sew it across twice and trim off the excess.
Now turn your owl right sides out, use the fish knife to poke out the ears and the base.
Fill the door stop with rice (you will be relieved to know I did not use the risotto rice in the picture but a cheaper rice), fill it and then poke your fingers in there as you will probably be able to pop in about a quarter more.  
Pin the opening together and slip stitch it in place.
Set your owl on the floor and let it do its job.
You are probably wondering why it is called Carrie's owl, well I sat next to her at my last job and she loved owls, and is a wonderful artist as well as mother, also she had some of the best asides I have ever heard... and if she is not careful she may find one winging its way to her!


Now on  you go over to Wendy's Handmade Monday and see what everyone has been doing during the past week.  I missed posting last weekend because I was busy celebrating my birthday at our Jubilee Street Party.

Saturday, 9 June 2012

I took the weekend off to celebrate the Diamond Jubilee

... and boy did I have fun!
We had our street party scheduled for Sunday, well actually it was four streets East, West, North and Alexandra and as I woke up I knew that was not the sound of fluttering bunting that I could hear, Oh no that was good old British rain... and there was no stinting on that weather front!  Bunting was strung from houses and then the committee got together to talk about Plan B... the wet weather solution... Thank goodness we had one!
And here is my sister who finally got to go to a street party, albeit a wet one!
We were able to use the drive way of one of the houses which was covered and with the aid of a large number of gazebos, we were good to go... and then the food started to arrive.
There were savoury tables and in addition to my sausage rolls, I made a Union Jack sausage, egg and Branston Pickle loaf... rather proud of the fact that it came out of the loaf tin in one piece :)
I love this pie,if you would like me to share the recipe, just let me know.


Then came the sweet table... cupcakes, Union Jack cakes, jellies and a number of trifles.  I made one of my faves which is a great way to use up those jars of fruits soaked in alcohol that you get at Christmas and you just don't know what to do with them.  If you want the recipe for that, let me know and I will put it up, it's the white dish at the end covered in toasted almonds.
And one of the most popular guests for photo ops was, Charlie who is a rather handsome cross English with American bulldog, which means he is a four stone hunk of gorgeousness.
Now one of the best local shop windows belonged to local cake makers Fancy Nancy Cakes, from the crown on the top to the corgies peeing on the leg of the guardsman, there was so much detail in this cake and it made me laugh.
Although the cake sculpture of the Queen was amazing.
So, really after all the fun we had last weekend, there is nothing really left to say but, God Save the Queen!