Let's get making, you will need the following:
A piece of wadding just a smidge wider than 10" x 18"
Pins, cotton
8" zip
Measuring tape
Scissors
Iron and Ironing board
Press your fabric and cut out two pieces 10" wide x 17" long. Pin the top (outer) piece to the wadding, use a quilting stitch from your machine to join together the top fabric to the wadding. I used a multi-coloured thread for added interest with a Serpentine stitich. Trim away the excess so that the quilted square is now 9" wide by 17" long.
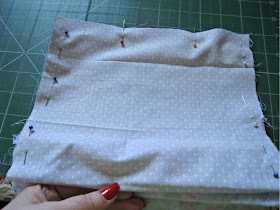
You are now going to make a sandwich with the zip, put the right sides of the top and lining fabric, slip the zip in between the two so that the back to the zip is on top of the lining, keep the edges together and sew all four layers together, make a roll and repeat this for the other side. Turn the roll right sides out. Pin the top fabric down and top stitch it closely next to the zip. Leave the zip open.
Measure up 2" from the zip on either side of the top fabric, this is going to create the top of your makeup bag, repeat this on the lining fabric. Pin down the quilted fabric but having pinned down the lining, cut the lining along the base. Sew down the quilted fabric using a 1/2" seam allowance, from the top to the zip, then repeat up from the base to the zip, repeat on other side.
Cut along the base of the lining. Sew down the sides of the lining using a half inch seam allowance bottom of the base but leave a 3" gap in the base and sew with a 1/4" seam allowance.
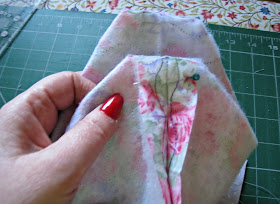
Now to give you a boxy base we are going to use a new technique which I have seen on a number of blogs and thought I would give a go. From the sides measure in an inch and a half and from the bottom measure up an inch. Cut out an oblong on both lining and quilted fabric on both sides.
Press open the seams and fold the fabric so the base of the sits in concert with the seam... sew it over twice to give it strength. Repeat this on each corner.
Now using the gap which you left in the base of the lining turn the bag inside out.
Sew together the base of your lining... you can slip stitch this or machine the lining together.
Push each corner of lining home, it will create a bag like a cake slice you would get from a birthday party ready to take all you lovely little pots...
Now book your holiday... you are ready to go!
Some of you may know that I got shoulder surfed at the Cashpoint on Monday evening, however my bank were superb. By Tuesday morning, they had refunded my money and my new card arrived on Wednesday, that is amazing service. Thank you so much Royal Bank of Scotland!
And now it is off to Handmade Monday to see what everyone has created during this rather lovely warm week in the UK


I always look forward to your tutorials and you never disappoint, another fabulous one! And you used one of my favourite words, unguents!! Brilliant. xx
ReplyDeleteWhat is it about mini toiletries that is so appealing?! And the shops usually do a 3 for the price of 2, and you end up buying more in weight than you would've taken if you'd stuck with your regular full-sized toiletries!
ReplyDeleteI love where you have put the zip. I have a fear of working with zips, but hope to conquer it sometime soon! So sorry to hear about your horrors at the beginning of the week, great to know your bank sorted it quickly :) x
ReplyDeleteI'm glad your bank sorted things out quickly for you Ros....So many horror stories about unhelpful banks about.
ReplyDeletexx
super tutorial :) looks like you're all set for your hols now!
ReplyDeletesorry to hear about your bank trouble, these things can be so stressful and time consuming to sort out - glad the bank of Scotland came through for you! x
I'm sorry to hear about the horrid thing that happened to you but I'm glad the bank treated you so well.
ReplyDeleteYour tutorial is great, I love where the zip goes, it makes it so easy to see what is in the bag.
Jan x
Es realmente precioso, y muy práctico.
ReplyDeleteBesos.
Lola.
Fab tutorial, as usual. Lovely to have a place for all those irresistable travel toiletries! Glad the bank came up trumps for you, things like that aren't nice to deal with xx
ReplyDeleteYou are right, Ros, those little bottles are all so tempting and all part of getting ready to go on holiday. Another great tutorial - thank you. Always well explained and easy to follow. Hope you have a good week.
ReplyDeleteGreat tutorial again and what a gorgeous fabric you chose for you cosmetic bag. You always make me want to make one - I'll get around to it one day!
ReplyDeleteAnother amazing tutorial! The bag looks so professional, great stuff. Thanks for the comment on my blog. Will it make you feel better to know that you can only see the floor for three weeks of the year - when Open Studios is on! xxx
ReplyDeleteGreat tutorial . Just right for those little pots of everything. Too late for my Hols this year but certainly a goer for the next one. Hugs mrs a.
ReplyDeleteBrilliant tutorial and I love the fabric you've used. Ali x
ReplyDeleteLove the fabric you've used Ros and great tutorial as always. With all the sewing i've done a zip is something i've never attempted, maybe i should have a go.Glad the bank sorted you out quickly and hope you're ok in your self now x
ReplyDeleteA handy bag and would be good for sewing as well
ReplyDeleteA great idea - just wish I could make a holiday to go on too!
ReplyDeleteLovely tutorial Ros and very seasonally apt, but I really like the idea of making your own Jubilee keepsake in your previous post, much more meaningful x
ReplyDeletePS I meant having a Jubilee keepsake is much more meaningful rather than the post being more meaningful than this one.....Oh be quiet Caroline you're rambling!
ReplyDeleteAnother lovely tutorial! I haven't learnt how to 'do' zips yet, but I feel I now feel I could. Great cushion - love the fabrics!
ReplyDeleteJo x
Hello! although I make pouches of different sizes, Ive yet to make this one where the top is smaller than the bottom front fabric.. im excited to make this! Thanks for the Printer friendly option!
ReplyDelete