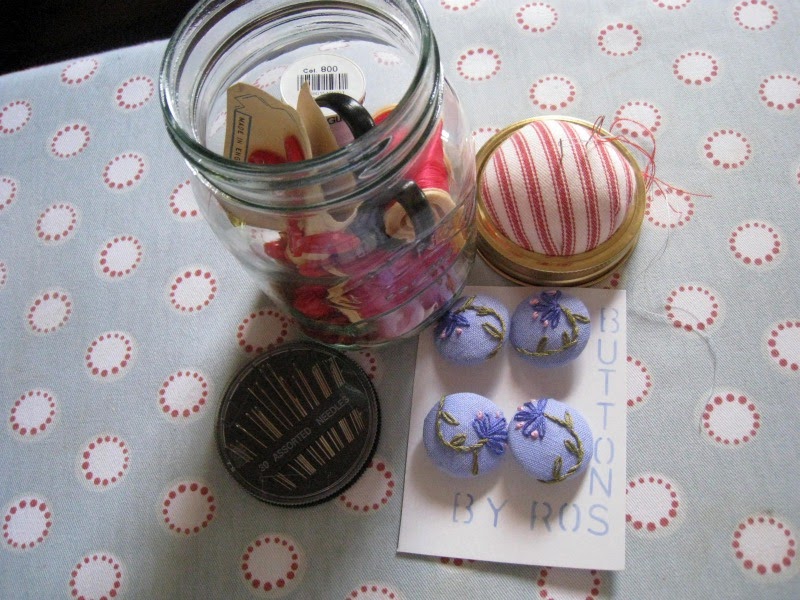
Showing posts with label Embroidery. Show all posts

Monday, 26 December 2011

What RosMadeMe does next?

I have been sitting here this morning planning what to do with the blog  moving forward into 2012 and thinking about how much I have enjoyed writing the tutorials especially leading up to Christmas.
So I have decided to continue to do tutorials every week during the next year for all the major holidays and special occasions which happen in the UK, the US and Canada and all points East and West.  My plan is to start posting up these up from about a month before the big occasion in order that you get enough time to complete them.


I am going to fill the gaps between the big occasions with a back to basics series.  You will know by now that I was lucky enough to be taught how to knit, sew and embroider by my mum and my primary school but I realise that not everyone was that lucky so we will do a bit of a crash course to make sure that you will be able to make the things that I come up with for the tutorials.
I am hoping to cover embroidery, knitting, crochet, sewing, quilting, a touch of origami and other papercrafts... but despite the picture above we will not be tackling taxidermy this year!


If you have a topic or a project that you would like covered next year, pop it into comments and I will try to schedule it in.


Now back to your Christmas leftovers everyone :)

Sunday, 30 October 2011

The Elves Christmas Garland - Christmas Tutorial no 11

I like working with felt, it is so forgiving and it is brilliant at making winter outfits for elves. Now as you all know, no self respecting helper of Santa Claus would dream of turning up for work without his mittens, socks and matching scarf... so in case of any elf being caught short you will now have a spare wardrobe hanging over your fireplace.
You will need:
Felt - I used 8 squares of 9" x 9"
Cotton
Embroidery thread or fabric paint
Scissors and Pinking Shears
Aqueous Marker Pen
Needle
Ribbon and/or hairy twine
Wool scraps
Knitting needles
Crochet hook
Sewing machine
Greaseproof paper
Access to baby clothes...
First you need to create a template for your mitten and sock... this is where your access to baby clothes is really helpful as you can trace around a baby's sock and mitten.  Well OK, I suppose that you could also Google for a template but it really won't be quite as much fun!
Now the great thing with felt is that it has not warp or weft which means that you can place your template wheresoever you wish as there is no right way for the fabric to sit, however you cut it will always be right.  
You will need to cut out 14 of each shape - I decided on green mittens and red socks.


Mark the letters out on each mitten or sock.*  I used a simple chain stitch in white embroidery silk and for the snowflakes, a star stitch.  You could use a stencil and fabric paints if you do not feel confident in your hand sewing skills and you can further decorate the socks and mittens with buttons, sequins and you might even want to consider using your glue gun and the table decoration snowflakes.
Pin the mittens and socks together and sew them together with a .5cm seam leaving the tops open.  Using your pinking shears, trim around the socks and mittens and across the top to give your garland a decorative edge.
Now you need to decide if you are going to hang your garland from ribbon - I chose a cheery tartan ribbon - or if you want a more rustic look, use hairy or garden twine.  Cut a piece of ribbon or twine that is long enough to loop over the ribbon or twine, now sew the across the top of the sock or mitten.
To make a really simple set of scarves, I used leftover scraps of Debbie Bliss Baby Cashmerino, a pair of size 3.75 needles.  Casting on eight stitches, I worked a simple rib pattern, knit 1, purl 1 to the end of each row, to get the stripes, I worked four rows then changed colour and worked a further four rows and then back to the first colour.  Continue to work until your mini-scarf measures 12" and then cast off the eight stitches.


Using short pieces of wool approximately 3" in length, put your crochet hook into the cast off stitches, loop the yarn around the hook and pull it through, leaving two tails behind, pull the the tails through your loop and now you have your fringe.  When all the cast off stitches have been fringed, trim the fringe so that the fringing is of equal length.


Finally slip the mittens and gloves onto the ribbon or twine, remember to put it in the right order by starting from the back and work through to the front, I mean only an idiot would get that wrong (Ros looks embarrassed).  You can now tie the scarves on at the beginning middle and end of your garland and find somewhere to hang it up for Christmas.
In case you are interested, this is the fireplace in my bathroom!
*If you are feeling really adventurous you could cut out 12 mittens and 12 socks to make an Advent calendar, replacing the letters with numbers and leaving the socks and mittens open so that you can hide delightful treats inside.
Now if this has whetted you appetite for all things crafty, get yourself over to the lovely Wendy's Handmade Monday which is now in its 40th week - wherever does the time go?


And finally if you would like me to make anything that you have seen on the blog, like the rag wreaths, scarves or garlands, please do not hesitate to drop me an e-mail.


Sunday, 25 September 2011

Buttons & bows - Christmas Tutorial no 5


The Button Jar

Since I was a child I loved my mother’s button jars, they were so exciting and in our house they were colour coded.  There was the white jar which contained the shirt buttons, snipped from exhausted shirts worn to within an inch of their lives with turned collars and cuffs and strung together for re-use and then my favourites, the dainty Mother of Pearl buttons, that caught the light and sparkled.  Then there was the bigger jar with huge coat and jacket buttons, in forbidding hues of navy, black and brown with horn buttons thrown in for light relief. And finally, my favourite the oddities, they were the bright shiny buttons, or the small delicate jobs shaped like flowers and I even seem to remember a few stray RAF buttons removed from my father’s Greatcoat.

Before my mother died she joked, “I’m not worried about making a will as I know that you two have got the contents of the house divvied up down to the button jars!”

So I thought we would make a practical and personal gift this week – a button jar with handmade buttons.  You will need:
A Leifheit Jar ( be impressed now, this is the official name for jar where the lid comes in two pieces, a metal disc and screw band)
Kapok stuffing
A heavy drill cotton scrap – eg, Ticking
Cardboard
Glue gun (well now I have one I should practice with it!)
6 Self covering buttons
Contrasting fabric scrap
Iron on fabric paints – or
Embroidery threads
Pencil or fabric marking pen
The embroidery hoop you can see belonged to my mum and is over 70 years old
Access to your kitchen for round items to draw around... or if you still have that set from Geometry or a Mason in the family, a pair of compasses
Embroidery hoop
Needle and scissors

Suggested contents to add to the jar
Small sharp pointy scissors
Set of sewing needles
White, Black Navy and Brown cotton
Hooks and Eyes

Take the jar apart and find in your kitchen a saucer, pint glass or large mug which is approximately 1" wider in radius than your metal disc lid.  Use this as a template to draw out a circle on your ticking fabric and then use the metal disc to cut out a circle of cardboard and cut out another piece of fabric about half an in wider in circumference.
Now using a double thread, tie a knot in the end and starting from the back of the fabric, make small running stitches about 1/4" from the edge.  Bundle up your stuffing and place it on top of the metal disc and capture the with your fabric... don't pull the fabric  tight until you are happy with amount of your stuffing, ie will it be able to hold needles and pins but not too full that you cannot get the screw band over it.  Now pull your thread tightly and sew off with a very firm couple of stitches.
Using the other circle, repeat the gathering process and place the cardboard circle in the centre, gather up the fabric around it and fasten off securely.  Now you can either glue the cardboard circle to the lid or whipstitch the two together - whipstitch is a simple over sewing stitch to join two seams together.
Now the jar is ready to be filled... so let's make some buttons to go inside.

Let's say that your button is an inch wide, then draw a circle that is 1.5" in radius, draw six circles like this  quite closely to each other and don't cut them out as we are going to stretch them over an embroidery hoop... I said DON'T cut them out, *tuts*
Now you have two choices, if you don't enjoy embroidery use your paints to creat a simple design on the fabric... I am the least artistic person you can meet so I will have go with needle and thread.  Let you imagination run riot... flowers, animals, shapes, letters, just go for it.
Carefully cut out your finished circles and with your doubled up thread sew a 1/4" from the edge, place the button in the centre and draw the fabric up.  
Now this is the fiddly bit, gently place the back cover over the button shank and push home firmly, you are allowed to swear quietly if the back cover pings off, this will happen about 50% of the time, it's the law!
Cut out a square of cardboard and using a large sharp needle, sew a couple of stitches to attach the button to the card.  If you have a compliant printer, print up some suitable wording to put on the card
.

So there you have it a day to day button jar with everything you need for a button emergency... and something for your children to fight over when you go!

And now for the really good stuff, pop over to Wendy's Homemade Monday and don't forget to leave a comment.  Have a great week :)

Saturday, 3 September 2011

No better way to start the weekend

Really, there is only one way to start a Saturday and this is it
As made by my chums at The Coffee Bean Company, a quirky little coffee shop just round the corner, yes I think any shop that acts as an official shelter to the Blue Lady pics from the 1960s deserves the accolade and they also make the best coffee this side of the Thames.


I am then off to collect a PE bag to do some emergency back-to-school embroidery... odd, isn't it, I never thought to see emergency and embroidery in the same sentence.