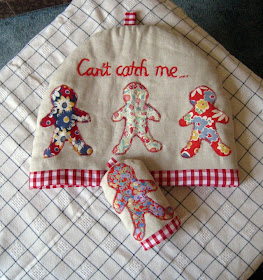
Before we start I have a confession to make, I don't drink tea, never have and never will but I do love afternoon tea. In fact, one of my earliest memories is having our tea delivered every Friday in quarter pound packs by Albert the Brown's tea man who drove a little green van and delivered all round Southend, we used to have so much delivered back in the 60s, the butcher Mr Wells, the baker, the Corona man (yes, even lemonade was delivered) and the milkman. So this week, we are going to make a tea cosy with matching egg cosies and yes, you've guessed it I don't do eggs and soldiers either... I wonder if that is why I want to hide them?
You will need
Grease Proof Paper
Top fabric (1/3 of a yard or metre) - I used linen but any heavyweight cotton will do
Quilting wadding (1/3 of a yard or metre) - I used a medium weight
Internal fabric (1/3 of a yard or metre) - Lightweight cotton, I used gingham
Small piece of double sided iron on lightweight interfacing
Cotton
Scissors
Sewing machine
Pins & needles
Contrasting fabric for applique
Chopstick or paint brush
And woe betide you if you don't have your iron and ironing board at the ready!
Almost in the words of the immortal Mrs Beeton, first catch your teapot, measure it in the middle from top to bottom and add two inches then measure the pot from side to side (from tip of the spout to the end of the handle) and add two inches. Draw this out onto the greaseproof paper - now you can leave this as a rectangle but really this is rather boring, so fold the paper in half starting about a two thirds in on the the top, mark it and then mark a spot half way up the side and draw the curve between these two points, by folding the paper in half both sides will look the same.
Now cut out two in your top fabric, then cut out two in the wadding but add an inch to the bottom (it will be longer than your top fabric) and finally in your inner fabric add two inches to the bottom of your patterm.
I found my gingerbread men template on a children's toy stall at a craft fair (along with a boat, a cupcake and a teddy bear) so if you have children take a look in their toy boxes or if they will not let you share toys, take a look at your pastry cutters. On the reverse side of your applique fabrics, trace around your template and cut them out, do the same on the paper side of the interfacing. Place the fabric templates on the top fabric and move them around until you are happy with the placement, place the interfacing onto the top fabric and then place the template on top and iron the applique into place.
Then select a stitch from your machine, I have used a stretched satin stitch, but you could use a simple running stitch to give it an edgier look. At this point you can also embroider on a message or slogan.
Now pin the the bottom of the inner and the outer together and sew the two together using a 5/8", press the seam upwards so that all the fabric is sitting under the upper fabric. Take your wadding and pin it all round the outer fabric, remember it will sit an inch lower than your outer fabric, sew it together using a 1/4" seam allowance.
Cut our a piece of fabric from the internal fabric measuring 6" x 2 1/2", using a 5/8" seam allowance sew across the top and down the side.
Using your chopstick turn it inside out and cut the end off, put the seam in the middle of the tab and iron it down so that the seam sits in the centre of the tab.
Fold the tab in half and find the centre top of your cosy, on the outside of the fabric and pin it so that it sits with all the raw edges together.
Leaving about 4" open at the top of the internal fabric, pin both sides together, taking great care to align the seams between the inner and outer fabric and sew them together using a 5/8" seam allowance.
Remove all the pins and then check again, reach in through the hole, grab the tab and pull it through the hole.
Have another feel around for any pins that still might be inside... see I told you there was another one in there!
Fold in the raw edges and sew the seams together.
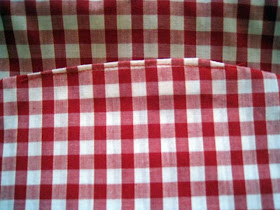
Now push the lining into your cosy, pop your cosy over the end of your ironing board and press the contrast border down. I have to give credit to Lisa over at Mimi and Cakes for the border idea, I think it looks fab.
Turn the cosy inside out and using a few stab stitches, catch the inner to the wadding to hold it in place. Now turn it out, give it a final press and get the kettle on!
To make the egg cosy, cut out a square of grease proof 6" high x 5" across, using the technique we used for the tea cosy, fold it in half and round the top - I found it easiest to use the base of a mug to create the curve. When cutting out, use an extra half inch on the wadding and an inch on the lining at the bottom to make a narrower border, as with the tea cosy cut two of each fabric. You will also need a shorter tab at the top of the cosy. Now follow the instructions that we used for the tea cosy to make up the egg cosy.
One tea cosy and two egg cosies would make a great prezzie for any couple... and to make me really happy, team it up with a pack of loose tea rather than tea bags for a proper cuppa and transport me back to Friday afternoons and the Brown's tea delivery.
Now if you want a really Christmassy tea cosy design, take a look here for one that I made as a Secret Santa gift.
And as you sit there with your pot of tea, go on over to Wendy's Handmade Monday. By the way I am off to the Post Office on Monday to collect my clock that I won on 1st Unique... cannot wait and there will be pics, I promise!


I have been meaning to make a tea cosy so thank you very much for the very easy tutorial! :o) x
ReplyDeleteOh Ros these are adorable!!! I love them and I think these might just have to be a christmas present for my grandparents who love their tea and dippy eggs! Thanks so much for sharing :-)
ReplyDeleteI love your tutorials, they always seem so simple yet turn out so wonderful. I really like the tea cosy, I don't drink tea either (or coffee) but i'd buy a teapot just to have this on display! x
ReplyDeleteLove your Gingerbread Men teacosy. Very novel. Makes me wish we used a teapot. Although I seem to accumulate them they end up along the top of the kitchen cupboard and we dip a teabag into the cup. And before you say it, I know it spoils all the fun. lol.
ReplyDeleteFab idea and love the gingerbread men decoration!
ReplyDeleteAmazing tutorial Ros. I love those gingerbread men and the colours are great. I am a tea drinker and an egg eater but I have to agree with Jam Dalory when she says just have them for display if you're not a tea drinker.
ReplyDeleteLove the gingerbread men so pretty and oh dear! I can remember the delivery days of the butcher and baker, Mother ringing the grocery store with her list. funny with the current home deliveries we have gone around again. No you cannot have those bulldog clips!!! whatever next.
ReplyDeleteI love your tutorials ros, thanks for sharing :)
ReplyDeleteA lovely tea-cosy Ros a great tutorial too. I am like you, I don't drink tea - I find that because of not liking tea, I can't make a decent cup either (or so I am told); its either too weak or too strong.
ReplyDeletePerfect - I've wondered for ages how to get the insides of the tea cosy as neat as the outside and hide all the seams - now I know
ReplyDeletethanks
Another amazing tutorial - you should write a book! Thank-you for sharing, I love the mix of techniques and difficulty.
ReplyDeleteJo x
I love this! I have a bit of a thing for gingerbread men at the moment, so I may have to consider making this. :)
ReplyDeletethe gingerbread men are a great touch as are the matching egg cosies!
ReplyDeleteFantastic tutorial and I LOVE the gingerbread men!
ReplyDeleteAs someone who is constantly drinking tea & loves egg & soldiers, I think both the tea cosy and the egg cosy look really wonderful :)
ReplyDeleteI drink loads of tea and love egg & soldiers! These are perfect for brightening up the breakfast table at any time of year. Beautiful.
ReplyDeleteLove your tute's Ros! Always make me wanna go away and try something new, so thanks for that! In all honesty though this one makes me want to make tea first :)
ReplyDeleteAnother amazing tutorial. I love tea but since I'm the only person who drinks it, I don't have a teapot. I'm the same as you with the egg and soldiers too.
ReplyDeleteYet another wonderful tutorial, Ros! I love the gingerbread men designs and might have to dig out the teapot and start measuring...
ReplyDeleteAli x
Really lovely items, would look good on any breakfast table, another easy to follow tutorial too.
ReplyDeleteJan x
Fab tutorial! Thanks
ReplyDeleteLovely. And you can't beat a bit of gingham. Fab.
ReplyDeletegreat tutorial as always Ros - thank you Mich :)
ReplyDeleteReally delightful - and an excellent tutorial to go with. Thank-you!
ReplyDeleteSo beautiful, and what a great tutorial!
ReplyDeleteI do drink tea but make it in a mug ... (my mum would have been appalled, with me being brought up with knitted tea cosies and the traditional tea making routine). But, I do own a teapot for 'visitors', you know 'keeping up appearances and all that. lol.
I don't eat eggs ... unless they're made up in a recipe - isn't that strange?
Well, I for one would love to receive these at Christmas - the little egg cosy is so cute! You make it sound so easy that even I might have a go!
ReplyDeleteThose are so adorable! I like hot tea, but don't make it often (I think we Americans are much more coffee drinkers, I know I am --partially that is laziness, coffee is easier to make perhaps!). But I have always wanted a tea cozy, I think I just love the idea. Plus one of my sons and his wife are very into tea. I might try making one of these for them at some point ---adding it to my to do list, which is getting QUITE long! :)
ReplyDeleteAwesome tutorial, thank you!
Love those little gingerbread men! I can just see them with a row of buttons down their front...
ReplyDeleteThanks for linking this up to my blog link, its really lovely.
ReplyDelete