Sunday, 27 May 2012

Make Up and Move On - The Make Up Bag Tutorial

I don't know about you but I find it really difficult when I am in the Chemist at this time of the year to resist those little holiday pots of shampoo, bath oils and other unguents ready for you to take off to your little piece of Paradise in the sun. I want them all... but you need to have a new bag to put them in .  So this week, we have an over-sized cosmetic bag to accommodate them all.
Let's get making, you will need the following:
Two pieces of fabric ( one piece 10" wide by 18" long and the lining 9" wide by 17" long)
A piece of wadding just a smidge wider than 10" x 18"
Pins, cotton
8" zip
Measuring tape
Scissors
Iron and Ironing board
Press your fabric and cut out two pieces 10" wide x 17" long.  Pin the top (outer) piece to the wadding, use a quilting stitch from your machine to join together the top fabric to the wadding.  I used a multi-coloured thread for added interest with a Serpentine stitich.  Trim away the excess so that the quilted square is now 9" wide by 17" long.
You are now going to make a sandwich with the zip, put the right sides of the top and lining fabric, slip the zip in between the two so that the back to the zip is on top of the lining, keep the edges together and sew all four layers together, make a roll and repeat this for the other side. Turn the roll right sides out.  Pin the top fabric down and top stitch it closely next to the zip.  Leave the zip open.


Measure up 2" from the zip on either side of the top fabric, this is going to create the top of your makeup bag, repeat this on the lining fabric.  Pin down the quilted fabric but having pinned down the lining, cut the lining along the base.  Sew down the quilted fabric using a 1/2" seam allowance, from the top to the zip, then repeat up from the base to the zip, repeat on other side. 
Cut along the base of the lining.   Sew down the sides of the lining using a half inch seam allowance bottom of the base but leave a 3" gap in the base and sew with a 1/4" seam allowance.


Now to give you a boxy base we are going to use a new technique which I have seen on a number of blogs and thought I would give a go. From the sides measure in an inch and a half and from the bottom measure up an inch.  Cut out an oblong on both lining and quilted fabric on both sides.
Press open the seams  and fold the fabric so the base of the sits in concert with the seam... sew it over twice to give it strength.  Repeat this on each corner.


Now using the gap which you left in the base of the lining turn the bag inside out.
Sew together the base of your lining... you can slip stitch this or machine the lining together.
Push each corner of lining home, it will create a bag like a cake slice you would get from a birthday party ready to take all you lovely little pots...


Now book your holiday... you are ready to go!


Some of you may know that I got shoulder surfed at the Cashpoint on Monday evening, however my bank were superb.  By Tuesday morning, they had refunded my money and my new card arrived on Wednesday, that is amazing service.  Thank you so much Royal Bank of Scotland!


And now it is off to Handmade Monday to see what everyone has created during this rather lovely warm week in the UK


Sunday, 20 May 2012

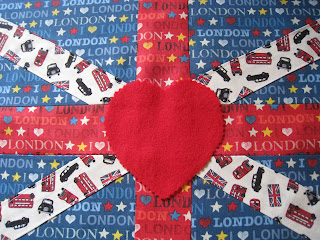
Jubilee Souvenirs... A Union Jack cushion tutorial

Despite what many may think I am not old enough to remember the Coronation, although my sister is still deadly miffed that the street party in the avenue that she lived in at the time, stopped short of her house and she was not allowed to join in with the jam sarnies and orange squash... how mean was that?  I, of course, have taken steps to prevent this happening to me by sitting on the Committee organising our street party... smart eh?


So as my sister got a mug for the coronation which she still has, I thought I would make a proper handmade souvenir... a stylised 2012 Union Jack cushion which you can customise with lace, ric rac brading or any other embellishment you can find.  I have gone with less being more with the fabric that I have used... you might want to use florals, polka dots or stripes, let you imagination rip!
You will need:
Three complementary or contrasting fabrics, I used two fat quarters and a half a metre 
2 Buttons
Cotton, pins, pinking shears and scissors
Cutting wheel and mat
Iron and ironing board
Sewing machine
Cushion pad (mine is 20" x 12")
Felt
Embroidery thread and needle
Heart shaped cookie cutter
Fish knife


Now, you know the mantra, if you are using fabric, the first thing to do is iron it, so get cracking and cut out four pieces 10 1/4" wide by 6 1/2" wide (blue fabric).  Now be careful if you have a directional pattern in your fabric to make sure it all heads in the right direction when you cut it out... if you are not sure, then walk away and look again before you cut.
Next cut out your diagonal stripe which will be 2 3/4" by  12" (from your white stripe) and iron under an allowance of 5/8" on each side, remember you are running all the stripes into the centre from the outside corner.. yes, I know you already know this... but I will be the one tsking when you have to undo it because you didn't check.  You might want to cut this on the bias, but really you don't need to and you will end up using more fabric than is really necessary.
Lay the strip across the square and pin it in place, sew it down 1/4" from the edge (use the edge of your foot as a guideline), you will find that there is an excess of fabric over the edges of the square, trim these away.
Lay out your pieces ready for the next stage.
Next, cut two pieces 3 1/4" x 10 1/4" (red fabric) and using a 5/8" pin a top and a bottom to the red and sew them together.  
Press the seams open.
Now cut out a strip 3 1/4" wide by 13 1/4 long and join your two sides together using a 5/8" seam allowance.
Now you can embellish your front, I went with a felt heart, using a cookie cutter as a template which I cut out on grease proof paper, pinned it to the felt and then used pinking shears to give it more attitude.  
Then to ensure that I would not forget what it was for, I embroidered in chain stitch with 2012 (which will also cover the London Olympics... another smart move, methinks).
Pin your heart in place and sew it, as close to the edges as you can, yet again I used the edge of my foot as a guide. The front of the cushion is now completed, yay!
Next you need to cut out two pieces of fabric, one piece should be 8 5/8" wide x 13 1/4" long, the other piece is 18 5/8" x 13 1/4".  Fold over two inches of fabric from top to bottom on each piece and press it, now fold over 1/4" and sew it under to create a neat edge.
Using the larger piece of fabric we are going to place the buttonholes on the piece of fabric which is folded over, to make sure that they are equally spaced, take away 1 1/4" (our seam allowance) and we are left with 12",   we are going to divide it into three as we need to place two buttonholes, so ours will sit at 4" and 8".  Mark the spot with a pin and use your buttonhole foot and button stitch to sew it into place.  I usually have a practice before I start on a scrap of fabric I am using to make sure that my tension and stitch size are OK... it is a lot easier to get it wrong on a scrap than on the real thing.

Now lay down the larger buttonholed piece of fabric, with right side facing the front right side, pin it in place and next put smaller piece down, it will overlap the buttonholed piece and pin it into place.  And as if to show you what a muppet I am, yours truly put them the wrong way round and had to undo it to re-sew it... so it really does pay to check.

Sew it all into place with a 5/8" seam allowance.  Clip the corners (you remember, cut off the triangle across the the corner) and trim down the seams to about 1/4" to reduce the bulk.

Turn the cushion inside out and use the fish knife to get good sharp corners (remember it will not go through your stitching because it has no cutting edge, per se).  Sew your buttons in place.
You are finally ready to put your cushion pad in place.
And there it is, your Jubilympics cushion... and you didn't even break sweat, did you?


Whilst I think of it, the butt ugly yarn has found a new home, my sister has taken it and is determined to make something from it that will make me love it... I can only wonder at her foolishness, but I am waiting to see what she will come up with...


Well now's the time to go over to Wendy's Handmade Harbour blog to see what everyone has come up with for Handmade Monday... I sometimes wonder how everyone fits in a day job when you see what fabulous things they create.

Friday, 18 May 2012

Me and Pythagorus attack the knitting!

I am, on occasion a Mumsnet blogger and sometimes I am really proud of what the ladies on there do.  There is a group on there who create blankets for people who have lost loved ones... it may be a child or a partner... we know that there is nothing that we can do to bring them back but we can create a tangible memory to sunggle up with, to show that for however fleetingly they have been here they are not forgotten.


So a call goes out on the forum to ask for people to knit or crochet and others to provide the wool so no-one is excluded from taking part.  Yesterday I completed my two squares... I get a parcel of bits and pieces and instructions to make something special... the girls like to challenge me!


And this is what I came up with:
The owl is because one of the families has a special affinity with birds and is created with just three cables worked over eight stitches.
And the stripey square is knitted from corner to corner, have you any idea how difficult it is to do random stripes,,, and as I knitted it, running through my mind was "the square of the hypotenuse is equal to the sum of the two squares on the two other sides." Funny how old maths lessons come back to haunt you!


Anyway they are now in an envelope off to be sewn up into a blanket :)

Sunday, 13 May 2012

How To Cheer Up An Old Bag (No Not Me) with a Handbag Charm

After I made the bias binding last week, I had about 18 - 20"  of piped cord left over...  not enough to pipe around a cushion... but too much just to bin, so what to do with it?  I sat there twiddling it and started to make a flower shape, but really did I need another flower brooch... err no!  And then it came to me, a handbag charm and for this you will need:
20" of covered tape (use this tutorial)
12" of bias binding or ribbon
Scissors
Needle and Cotton
Pin
A piece of felt
Decorative button 
Handbag clip

Take your covered bias binding and create a loop (remember flowers have uneven numbers of petals... and please don't sit there plucking petals off daisies, you know I will be right and you will get bored with counting :)  ), pin it into place.
 Thread up you needle with a matching thread and stab stitch it through twice... this is literally as it sounds a stitch through both cords, it does not need to be pretty as it will be covered.
Now create another loop opposite the first, pin and stab stitch in place, repeat this until you have five petals and  sew off firmly.
From your felt, cut out a flower shape... I did this by finding a glass which covered my cord flower, drawing around that, then using the cord flower to trace around.


Now sew the seams of the bias binding down (don't bother if you are using ribbon), place it in the centre of the felt flower and sew it into place.  The felt will protect your bag from any potential scratches from your charm.
Put your corded flower in the centre and choose a suitable button for the centre.  To sew the button in place, I recommend that you use a thimble if you can and work the needle through a couple of layers at a time as you have quite a dense mass to get through.
Slip it onto your clip and attach it to your handbag... job done!
Now I know that many of you will be wondering if I managed to get a better ball of wool from my stash to make my socks, well the answer is a resounding yes!  A rather lovely hand dyed Peruvian yarn which shows up the diamonds on the socks beautifully.


And next it is time to go over to Handmade Monday which has moved to Wendy's other blog, Handmade Harbour which is a great read, so take a good look around.

Thursday, 10 May 2012

The Yarn Is Butt Ugly - What Can I Do?

You know how it is, you have this ball of beautiful yarn in your stash, you have stroked it, held it up to the light, imagined what you could make from it.
And then you start the knitting, but slowly the realisation dawns... it's really bally awful.

I spent forever on Ravelry going through sock patterns and could not find anything that I liked, undeterred, I started to make up my own.  A simple but effective textured diamond pattern, with an eye of partridge heel and a double rib to hold it tight and keep the sock up... it had everything going for it, it really did.
And then I started knitting it, it was not too bad to start with, it had potential... but Dear God, then the next colour and the rot set in... ghastly is not close.  The pattern worked fine, so fine I could sit on the train dreaming up another half a dozen socks... and then I looked down.  What on earth was I thinking... it looked like, well let's be honest, back in my student days it was called a technicolour yawn.

So now I have a dilemma, do I finish it... and then force myself to knit its mate because frankly it is too horrid to even contemplate a giveaway.  Or do I rip it back, ball it up and leave it in my stash as a scary reminder of how bad my taste can be... and the scary thing is I have another ball in other colours, I wonder if this will be the same when knitted?

I think I may have to remove it from the needles, just in case they get tainted by the yarn... I think it is a wise precaution until I decide what to do...

Whatever was I thinking... Sighs deeply :(

Monday, 7 May 2012

I'm biased that way... how to make bias binding and Chinese buttons tutorial

Well it's a Bank Holiday weekend here in the UK, and frankly thermal underwear is starting to look rather attractive to me along with a chunky bowl of broth and a roaring log fire!  It is cold, to the point where I am wearing gloves and wondering if I will ever wear my Birkenstocks again... Brrr!


Still it gives me a chance to have a play and and go back to basics to make something rather special, which means this weekend it is bias binding and Chinese buttons.


Let's get started, you will need:
A square of fabric... I am using 10" x10" but it must be perfectly square
Rotary cutter and cutting mat
Scissors
Water soluble pen
Bias binding tape maker
Iron and ironing board


First iron your fabric and cut out an exact square, then cut across the square to create two triangles, place piece B on top of piece A with right side facing and sew a seam of 1/4"... remember to check if the distance from the need to the edge of your foot, on most machines it is and this makes a great seam guide.
Press the seam open, you need to press it on both sides as sometimes the seam gets creased up.  Now it is really important that when you lie the fabric back down the the seam goes on the diagonal... if you have it straight up and down you get strips of fabric and not bias binding (if you are not paying attention, like the author, this will happen to you, too!) which means you have wasted fabric and it will be too small to do anything with!
Now using your water soluble pen, draw lines across the fabric... add 1/2" to the width of tape you require so 1" tape would require lines 1.5" apart.
Next we are going to join together sides C and D together to form a tube, now this is not quite as it seems (no pun intended) you need to lift one end so that it is a line above the other side, and when you reach the other end it will be one line shorter - basically you go against the grain and have an uneven seam.  Pin them together, ensuring the lines bisect each other at the seam.
Sew it together using a seam allowance of a scant 1/4" and press it open... if you want to do this without creating a line on either side, roll up a towel and place it inside your tube and iron it on there... this also makes a brilliant way to iron sleeves if you do not have a sleeve board.
Now using your scissors cut along the lines to reveal your bias binding.
Now, it is time to play with the gadget, get your iron ready, you will notice that at one end of the tape is cut across the diagonal and this makes it easy to thread it through your bias binding maker.
If the binding will not go through, you will find a groove down the middle of the bias binding maker, use a pair of small scissors and drag them along the groove to push the fabric through.
Can you see how the edges are already curling over?  You can either pin the point down on your ironing board and gently tug the binding through the device (using the little handle) and pressing it down with your iron pull it through under the iron from the other side... and if you think I have grown another hand to take a picture of me doing this, you will be sadly disappointed!  But it is easy to do this.
Now let's get cracking on the buttons, you will need, some bias binding, cord and sellotape.

Fold the tape (as I am taking pics, I have used a thicker twisted piping cord so that it shows up better) in half and mark the middle with a pin and wrap each end with sellotape, otherwise you will end up with an unravelled mess... a bit like my brain feels by Thursday morning at work!


Fold the bias binding around the cord up to the half way mark.
Sew along right next to the cord using a zip foot and when you come to the middle, sew across the cord. 
Trim back the excess from the seam.
And now the magic starts for me, start to ruche the fabric up in the middle.
Push your ruched fabric onto the uncovered cord and then pull through to the end, sometimes this will happen really easily and other times like a small child it will need a little persuasion.  The first time I did this it was a real lightbulb moment as I realised how it was done, yay!
Cut the other end of the cord off close to the sewn end.  Don your old Brownie or Guide uniform, we are going to make the knot, if you have problems with manual dextererity you might find it easier to do this on a cork board.  Loop the covered piping as shown, ie, keep the short end to the left and loop once going over the top.
Next make another loop on top of the first loop and run the long tail under the short tail you are clutching in your left hand. Do not move, do not sneeze, do not pass go!
Take the long end and weave it through as follows, over the first loop, under the second, over the third loop and under the last loop.
Now tug.  Do not worry if it does not go smoothly, you can manipulate it through to create the knot.
Cut the ends off, trim the cord inside the tube back slightly, fold the ends in and slip stitch them onto your button.
 And now you have a Chinese button, ready to sew onto your garment.

Now, in my best school teacher voice, you have just learnt three separate couture techniques, bias binding, covered piping and Chinese Knot buttons... how clever are you?

Right everyone, it's a Bank Holiday, get the coffee or tea on and let's adjourn to Wendy's Handmade Monday... what better way to spend a morning?