Wednesday, 5 October 2011

The cure for anything is salt water - sweat, tears, or the sea

That quote is from Isak Dineson, aka as Karen Blixen of Out of Africa fame... and this was so true on Sunday when I went down to the Old Town for a walk.
This boat was about to lay her anchor and take her sails down as we sat on the Wharf in old Leigh on Sunday, the sun was setting and the estuary looked like a Greek harbour in the golden half light.
And here on the side of the wharf is the fishermen's co-operative... best cockles in the world come from Leigh-on-sea... honestly I frequently do quality control visits to make sure the standards are maintained.

And this is one of my favourite slipways between The Mayflower and The Smack pubs...
Looking over the railway lines to the mouth of the Estuary, so many boats out on Sunday due to the wonderful weather we enjoyed.
Now don't be deceived, at the other end of the High Street the road past The Peterboat was heaving as The Crooked Billet was hosting a Pink Charity Fundraiser and the pubs were running out of booze as the weekend had been so busy!  Although my recent discovery of Crabbe's Ginger beer was still available, all that was missing was the Famous Five :)
And dusk fell all too soon on the weekend as we wended our weary way up the hill home.

Sunday, 2 October 2011

Christmas Tutorial no 7 - Folding Frenzy to Make The Origami Box

Now if I can make these so can you, this is a really useful skill and could save you some pennies making pretty boxes to give your Christmas gift in.  This tutorial is for a small square box but by varying the size of the paper, you can change the size of the box.
Origami box with cover
Two pieces of paper - I used a piece 8 x8" and another piece 8.5" x 8.5" for the lid
A flat surface
Put the printed side down on the table and fold in half on the diagonal and then again on the other diagonal.
Next fold each corner into the centre
Now take each corner and fold up to the line above the centre (you can see that a square is formed and you are folding to the centre point of that line)
And now fold a small triangle for each corner.
Fold the two opposing sides into the middle, now fold in the side edges.
Turn the box over, you will see that there are four squares, taking the first square, fold a diagonal across the square and repeat this on the other side.  Lower the flap into the centre and push back to the side, running your nail along the edge to define the side.
Repeat this on the other side.  
As we are doing this in a heavy paper, you may find that the paper will lift, there is no shame in popping a little dob of glue on the base to hold it in place.
Repeat the whole process with the larger sheet to make the lid.

And don't forget to pop over to Wendy and Handmade Monday - from what I have seen so far, a real bumper bundle of goodies today!

BOGOF Christmas Tutorial no 6 - Pop Can Jewellery

As we are living in straitened times and not to be outdone by the big Supermarkets, I have decided to enter the world of BOGOF (Buy One, Get One Free) or more accurately GOGAT (Get One, Get Another Too).  So this week, you are getting two tutorials, the first is for Pop Can Jewellery and the other is for an Origami box to put it in.  

Pop Can Bracelet, Necklace or Earrings

Empty Pop Can
Pair of Kitchen Scissor
Punch
Fine metal thread or Invisible thread or a Fishing Line
Map Pin
Emery Board
Findings to close the bracelet
Drink the contents of the can and wash it out.  To start cutting the can, taking great care, stab one of the blades into the top of the can and cut around the can lid.  
Then cut down the can and cut around the base, you now have a rectangle to work with.
Place the metal in the punch and punch out your shapes... the metal is actually thinner than some of the heavier papers used in card making and will cut quite easily.

Using your emery board, run it around the edges to smooth off any sharp or jagged edges.
Lay out your shapes and using the map pin, punch through to make a hole on each side of the shape, use the emery board again to smooth off the excess.
Decide the order that the shapes will sit in your bracelet, then lace through with the thread of your choice making sure that longer piece of thread sits behind the bracelet... remember to leave a long tail before you start so you can weave it into your closing findings.

And ta daaaaaaaaa... there it is, your incredibly green and recycled bracelet.

Now if you want a box to put it into take a look here..

Also go take a look at Handmade Monday and see what everyone has been up to.

Tuesday, 27 September 2011

Happy Birthday Little Blog!

I cannot believe that I started to witter online a year ago but boy have I enjoyed it!

So, as it stands at the moment, I have had 20,603 hits, for 83 posts and just over 600 comments.  I have had visitors from all over the world, including a group of ladies in Brazil, some cross stitchers in Israel and looking at today's stats, Brits, Irish, Aussies, Kiwis, Serbs, Canadians, Americans, Indonesians and Greeks.  It just amazes me how people find the blog.

During this time I have learnt to write regularly, post up pictures and to improve my tutorial writing... well, I should have got better as we have 18 tutorials on line and counting.  I have even set myself a challenge of writing a tutorial every week until Christmas and I promised to do this stone cold sober!

And what will Year 2 bring?  Well, I am going to begin regular book reviews, more tutorials - let me know if there is something you would like me to tackle - and better pictures *note to self, practice more and find a use for the jar of marbles*

Finally thank you to all of you who take the time to read the blog and leave comments.  I still get such a frisson of excitement when I look at the daily stats and see how many have looked, where they have come from and what they think of the blog - thank you all very much and don't be a stranger xxx

Sunday, 25 September 2011

Buttons & bows - Christmas Tutorial no 5


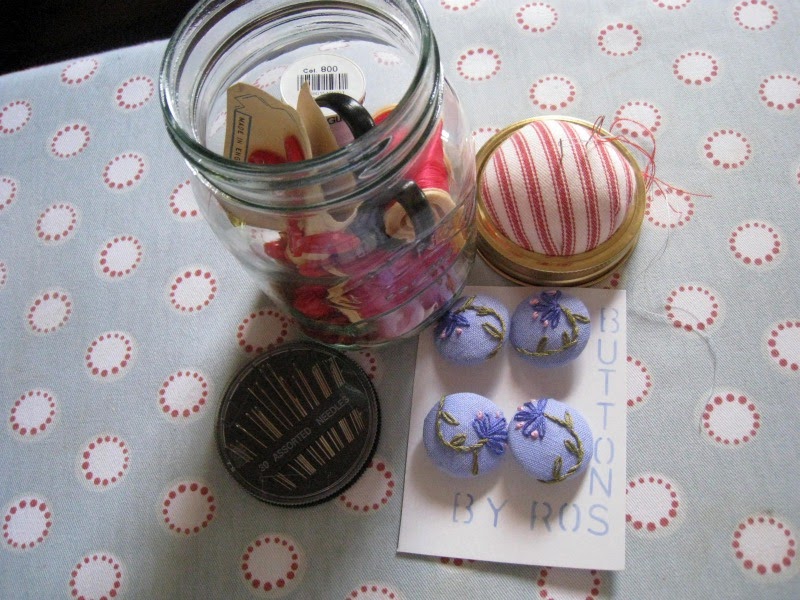
The Button Jar

Since I was a child I loved my mother’s button jars, they were so exciting and in our house they were colour coded.  There was the white jar which contained the shirt buttons, snipped from exhausted shirts worn to within an inch of their lives with turned collars and cuffs and strung together for re-use and then my favourites, the dainty Mother of Pearl buttons, that caught the light and sparkled.  Then there was the bigger jar with huge coat and jacket buttons, in forbidding hues of navy, black and brown with horn buttons thrown in for light relief. And finally, my favourite the oddities, they were the bright shiny buttons, or the small delicate jobs shaped like flowers and I even seem to remember a few stray RAF buttons removed from my father’s Greatcoat.

Before my mother died she joked, “I’m not worried about making a will as I know that you two have got the contents of the house divvied up down to the button jars!”

So I thought we would make a practical and personal gift this week – a button jar with handmade buttons.  You will need:
A Leifheit Jar ( be impressed now, this is the official name for jar where the lid comes in two pieces, a metal disc and screw band)
Kapok stuffing
A heavy drill cotton scrap – eg, Ticking
Cardboard
Glue gun (well now I have one I should practice with it!)
6 Self covering buttons
Contrasting fabric scrap
Iron on fabric paints – or
Embroidery threads
Pencil or fabric marking pen
The embroidery hoop you can see belonged to my mum and is over 70 years old
Access to your kitchen for round items to draw around... or if you still have that set from Geometry or a Mason in the family, a pair of compasses
Embroidery hoop
Needle and scissors

Suggested contents to add to the jar
Small sharp pointy scissors
Set of sewing needles
White, Black Navy and Brown cotton
Hooks and Eyes

Take the jar apart and find in your kitchen a saucer, pint glass or large mug which is approximately 1" wider in radius than your metal disc lid.  Use this as a template to draw out a circle on your ticking fabric and then use the metal disc to cut out a circle of cardboard and cut out another piece of fabric about half an in wider in circumference.
Now using a double thread, tie a knot in the end and starting from the back of the fabric, make small running stitches about 1/4" from the edge.  Bundle up your stuffing and place it on top of the metal disc and capture the with your fabric... don't pull the fabric  tight until you are happy with amount of your stuffing, ie will it be able to hold needles and pins but not too full that you cannot get the screw band over it.  Now pull your thread tightly and sew off with a very firm couple of stitches.
Using the other circle, repeat the gathering process and place the cardboard circle in the centre, gather up the fabric around it and fasten off securely.  Now you can either glue the cardboard circle to the lid or whipstitch the two together - whipstitch is a simple over sewing stitch to join two seams together.
Now the jar is ready to be filled... so let's make some buttons to go inside.

Let's say that your button is an inch wide, then draw a circle that is 1.5" in radius, draw six circles like this  quite closely to each other and don't cut them out as we are going to stretch them over an embroidery hoop... I said DON'T cut them out, *tuts*
Now you have two choices, if you don't enjoy embroidery use your paints to creat a simple design on the fabric... I am the least artistic person you can meet so I will have go with needle and thread.  Let you imagination run riot... flowers, animals, shapes, letters, just go for it.
Carefully cut out your finished circles and with your doubled up thread sew a 1/4" from the edge, place the button in the centre and draw the fabric up.  
Now this is the fiddly bit, gently place the back cover over the button shank and push home firmly, you are allowed to swear quietly if the back cover pings off, this will happen about 50% of the time, it's the law!
Cut out a square of cardboard and using a large sharp needle, sew a couple of stitches to attach the button to the card.  If you have a compliant printer, print up some suitable wording to put on the card
.

So there you have it a day to day button jar with everything you need for a button emergency... and something for your children to fight over when you go!

And now for the really good stuff, pop over to Wendy's Homemade Monday and don't forget to leave a comment.  Have a great week :)

Wednesday, 21 September 2011

Fighting Newton on the way to the Office

My alter-ego this morning!
A word of warning, if you wear hold ups they do not always live up to their name and they do obey the laws of gravity!  Yes, I admit it, this morning I was walking along Fenchurch Street in London when it happened.  My stocking went rogue...

It slithered down my leg, fortunately I was wearing my long, calf length dress but even so I knew that the lace and elastic were about to make a final break for freedom.

Do you know how few doorways there are in the City where you can hoick up your stockings?  As to a toilet, well just forget it...  I had to make do with the desperate, unsbutle clutching of my leg, while approximating a close impersonation of John Cleese with my very own silly walk, frankly more of a limp with a touch of a hunchback thrown in.

I managed to make it to an M&S and pick up a new pair and as I like to live dangerously, no I did not buy tights!

Finally next week I will have been blogging for a year, I would like to get 20,000 hits and am well on course, so thank you for clicking on here today.

Sunday, 18 September 2011

The Snuggly Reversible Cable Scarf - Christmas Tutorial No 4

Right, who is already running screaming for the door at the thought that not only are you going to cable but your knitting is going to be the same on each side?  I promise you it will be really easy, think about it there are three stitches that look the same on both sides: garter, rib and moss or seed stitch and we will be using rib and moss stitch, and to help you further there is a YouTube demo of cabling pasted at the end of the pattern.


The scarf is made with Sirdar Big Softie and measures 6' 6" and the great thing is it will knit up really quickly... I made mine in two days on the train (45 min train journeys) and the great thing is with size 10 needles few are brave enough to sit next to you!  The good news is this scarf is butch enough for chaps and, soft and snuggly enough  for girls.


The Pattern


4.5 balls of SirdarBig Softie Yarn
1 pair of size 10 needles
1 cable needle (the chunky variety)


Abbreviations
K - Knit
P - Purl
C6 fwd - Cable 6 stitches forward (slip  stitches onto your cable needle and bring them to the front of your work, k1, P1 the next 6 stitches from the left hand needle, k1, p1 3 times from the cable needle


Cast on 24 stitches
Row 1 - K1 P1 to the end of the row
Row 2 - P1 K1 3times, K1 P1 6 times, P1 K1 3 times
Repeat the first two rows 3 times
Row 9 - K1 P1 3 times, C6 fwd, K1 P1 3 times
Row 10 - P1 K1 3times, K1 P1 6 times, P1 K1 3 times


These 10 rows are the pattern, repeat 19 times and cast off.


Knitting Tip - When you are coming to the end of the ball, start your new ball at the beginning of a row as this means you will be able to sew in your ends neatly and they will not show up like they might if you have do this in the middle of a row.


Now stand with your nose pressed to the window watching for the cold weather to come so you or your recipient can swank out in your impressive scarf.
And now it's time to go over to take a look at Wendy's Handmade Monday, she's been on her hols so you just know that she will have come back inspired.