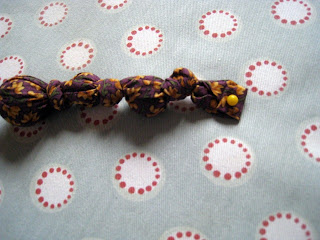
On Friday night I was tossing and turning about what I could make next... I thought about devising a pattern for a simple cable scarf, you would all have plenty of time to get that done by Christmas - but as a friend asked me out for a drink, I decided that I would have to make something that was a tad quicker, after all a G&T was calling. So then it came to me, something quick, easy and attractive, a girlie Xmas gift - the fabric covered necklace.
Lady Elgin's Necklace
Option A - Small boy with marble collection with about a dozen or so spare marbles
Option B - Marbles from the Pound shop or a defunct large bead necklace
A piece of fabric 44" long by 4.5" wide - just check that your fabric will wrap around your largest bead
A 60cm of narrow velvet ribbon
and as we are working with fabric, your iron and ironing board
Needle and cotton
Matches
If taking option A, explain to small boy that your need for marbles is greater than his, I did try this with my Godson but failed spectacularly so I bought a jar of Marbles from the local Pound shop!
Lay out your marbles in the order that you will want your fabric wrapped beads to lie... I chose three large marbles and eight small marbles.
Press the raw edge of the long side of the fabric under, about 1/4" should do it. Now fold it in half so that you can find your centre point.
Place your centre bead there, we will be using this as our marker as everything will fan out from there.
Twist the fabric as tightly as you can and tie a knot into the fabric or you might want to use some jewellery spacer beads/cuffs. Now keeping the fabric wrapped around your marble, twist tightly again and tie another knot or place in your spacer.
Working alternately on the right, then left of the centre marble continue until all your marbles are wrapped up
Fold over the end of your fabric neatly and over stitch this in place.
Now cut your velvet ribbon into two equal pieces, remembering that velvet ribbon has an affinity with 100m runners, flame the ends to seal the ribbon.
Stitch the ribbon in place at both ends.
Tie your necklace in place with a bow... await compliments and requests for the shop address!
Now don't you think it is time to high tail it over to Wendy's Handmade Monday BTW, Wendy's plaques got an honourable mention in the Telegraph as a kitchen must have, and do you know they are are quite right!


21 comments:
What a fun idea! Easy to follow tutorial too :)
What a great Tutorial. I could even get the Grandkids to make these. Great idea.xxx
Your posts are always entertaining and educational (brill tutorial - such a quick and unusual necklace)and they make me smile while I read. You have a witty way with words!
Love the necklace, hope you gave the small boy a box of tissues, lol.
Loving this! Going to see what fabric I have that I could recycle to make one of these! :)
Where do you get your ideas from? Always unique, always fabulous, always makes me want to have a go.
Another fantastic idea, Ros.
that's such a great idea!! You have inspired some of my stocking fillers :-) x
What a brilliant idea - and one even I (with no jewellery-making skills at all) could have a go at. Love the suggestion about a small boy and his marble collection. Poor child. Thanks for mentioning my mention ;-)
I know a small boy with marbles, so I think I must be half way there! What a good idea
Thanks for the kind comments, I did toy (no pun intended... well not much) with the idea of using those little compacted rubber bouncy balls as the bigger beads. However, I had visions of the necklace coming undone and bouncing back up to give the owner a black eye!
What a lovely necklace and a great blog.
Jill
Wonderful idea! Thanks for the tutorial, I love it. :)
fab idea! off in search of some marbles now :o)
Fab tutorial. Didn't know that trick of flaming the ends of the velvet ribbon. Hugs Mrs A.
Thank you for the tutorials. Very creative. More ideas on how to use fabric.
Another great tutorial - thank-you so much for sharing.
Jo x
brinkka2011 says: I'm impressed, I have to say. Really rarely do I encounter a weblog that's each educative and entertaining, and let me inform you, you will have hit the nail on the head. Your concept is outstanding; the difficulty is one thing that not sufficient individuals are speaking intelligently about. I am very joyful that I stumbled throughout this in my seek for one thing referring to this.
Great (and funny!) tutorial. Will have to have a look to see what fabric I have going spare :)
LH
x
brinkka2011 says: Sick! Just obtained a brand-new Pearl and I can now read your blog on my phone's browser, it didn't get the job done on my aged one.
So effective!
Thanks so much for taking part in Weekend Wonders last week. Hope to see you again this week!
Post a Comment